
What scares you most about landscape photography?
The kit you need?
The controls you have to master?
That feeling when you're standing in front of a spectacular view and you know that if you take a photograph it won't look anything like what you're seeing?
You can't be a confident photographer if you're scared. I've just spent 4 days in Scotland being taught landscape photography by the legendary Glen Campbell (Lightstalker Adventures), to overcome my own particular fear of composing from my feet all the way to the horizon.
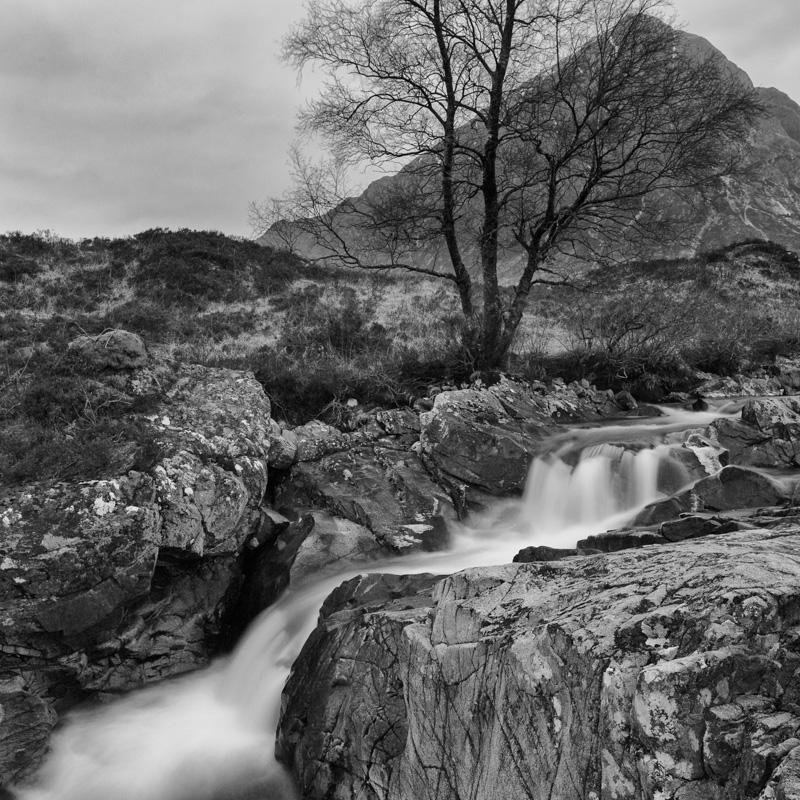
What do I mean? Well, before I went north, when presented with a vista, I would reach for my 200mm and create something like this:

There's nothing wrong with this, but it's a compressed shot, excluding everything from my feet to the middle distance.
Or I'd do this - crop close on something in the foreground but steer clear of opening up to the bigger picture:

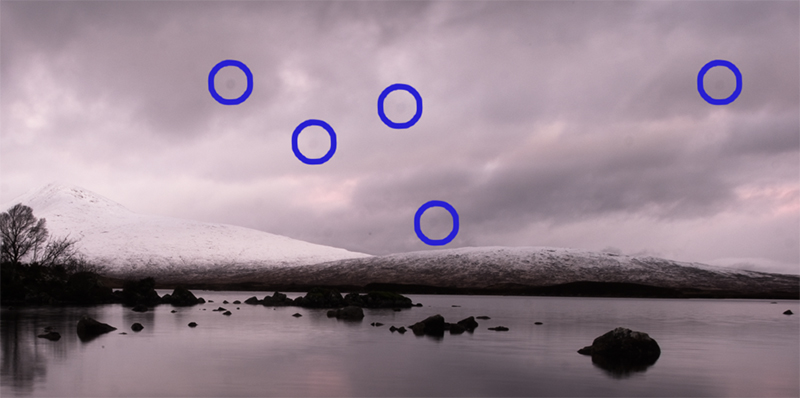
If I tried to shoot from feet to horizon, I'd end up with a mediocre shot like this (shot on my first day on Glen's workshop):

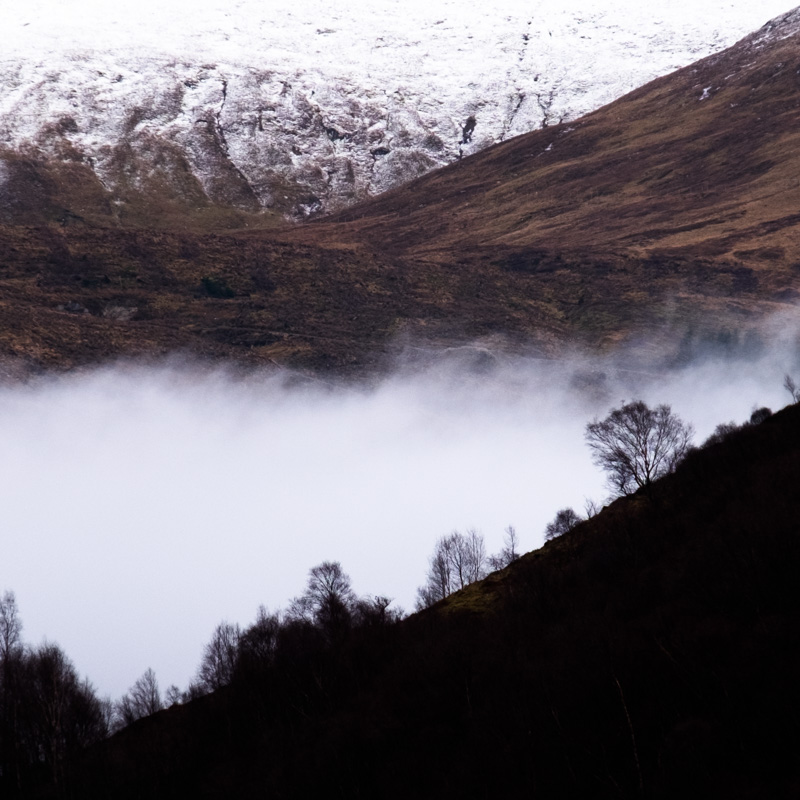
The shot that has eluded me is something like this:

I took this on the last day of the Glencoe workshop. Can you see I didn't crop out the rocks under my feet, and I managed to create curves, movement and interest all the way to the horizon? Without losing (too much) to black holes and distractions. This is what Glen taught me, patiently and with good humour.
I'm now confident I could reproduce this, and apply everything else I've learnt, in different places and in different weather.
(I still need to get the shot in landscape aspect, and I really need to work on my colour editing. But that's the best thing about photography - there's always something to aim for. It really is all about the journey, not about arriving at the destination.)
So here are the 5 steps I've taken during my career to get to this point of being a confident landscape photographer. (Notice I didn't say fabulous or prizewinning. Aim for confidence and then your own vision can start to emerge through your camera.)
My most recent influence has been Glen and the Lightstalker Adventures workshop, but I also need to mention Galen Rowell's Inner Game of Outdoor Photography (the only book I've read at least 4 times cover to cover), the Headspace meditation app (gets your brain used to focussing), and my camera manuals (you really do need to read the manual).
Step 1: Attitude
1. Only compare yourself to the photographer you used to be
You step out of the minibus and watch as your fellow students unpack tripods and filters, microfibres and lenses, and stride confidently off to where they want to set up. They all seem to know exactly what they are doing. What do you do and what do you think?
The easy thing to do is assume they are all better than you, they'll laugh at your photographs, and they'll be criticising where you choose to stand.
The more productive thing to do is recognise everyone's journey is their own. We all started at exactly the same point, but we're all aiming for different destinations - we're all here to take different images.
Don't waste all that mental energy worrying about what other people are thinking and doing. Look at what's under your feet and if you need to worry about anything, worry about how you're going to translate that into a 2 dimensional image.
2. It is what it is
This is where the Headspace app comes in (or any other meditation practise).
Fear of the blank canvas? Relax, look, focus, start to see what's actually there.
Fear of missing out? The view will be better up the road? The light was perfect half an hour ago? Be in the place you've chosen and the moment you've picked.
You've brought the wrong kit? This would be perfect if only you had a polariser, or a wider angle lens? Let it go. You've got what you've got - make the best photograph you can with it.
3. Prepare to leave your comfort zone
It's painful and you'll take some dreadful photographs as you leave, but once you're on the other side you'll see the world in an entirely different way.
4. You are what you do, not what you say you'll do
You cannot learn photography, least of all landscape photography, by reading about it. It's not until you are standing with a vista before you, with an infinite number of photo opportunities, that you realise you are the only person who can decide where to set up and what to do next. Books, magazines and online courses will not teach you this. Go, get your feet wet; do it.

Do you need help getting off Auto mode?
I run a free, online beginner's photography course that will get you off Auto mode in 6 weeks, ready to venture into the great outdoors. Register here:

Step 2: Know your kit
1. Can you shoot fully Manual?
You don't need to shoot on Manual mode all the time, but you do need to know how to do it. You will be constantly weighing up depth of field considerations and motion blur options. You'll want to be on a low ISO for better image quality (no point hiking all that way to come home with a noisy image). The light changes in seconds, so you do need to know how to change your settings without thinking about it.
2. Do you know the hyperfocal distances of all your lenses at all your apertures?
Do you know what hyperfocal distance is? Once you've mastered depth of field, make this the next thing you learn. I'm not ready to memorise all the distances for all my lenses at all my apertures, so I'm pleased to live in the 21st century. There are many apps that will do this for you. I downloaded Photo Pills as soon as I got back from Scotland.
3. What can you fix in editing?
Do you know what is unsalvageable, and what you can fix in editing?
I don't have any ND grad filters, but by exposure bracketing and stacking later in Lightroom, I can rescue a blown sky. Yes, it's quicker to do it in-camera with a filter, but you can still get the shot if you know what your editor can do. You can't fix camera shake, but there's a work around for most other things. (Including there being too much light for a long exposure - my first shot above of the waterfall has a bit of motion blur and liquify tool editing on the water in the pool.)

No editing.

Using the Lightroom graduated ND filter to bring back both contrast and colour to the sky.
Shoot RAW to give yourself as many options in editing as possible. (What is RAW and Why Do You Need It?)
4. Will you stay dry?
Don't let your wet weather gear be the reason you have to come home early.
And take plenty of snacks.
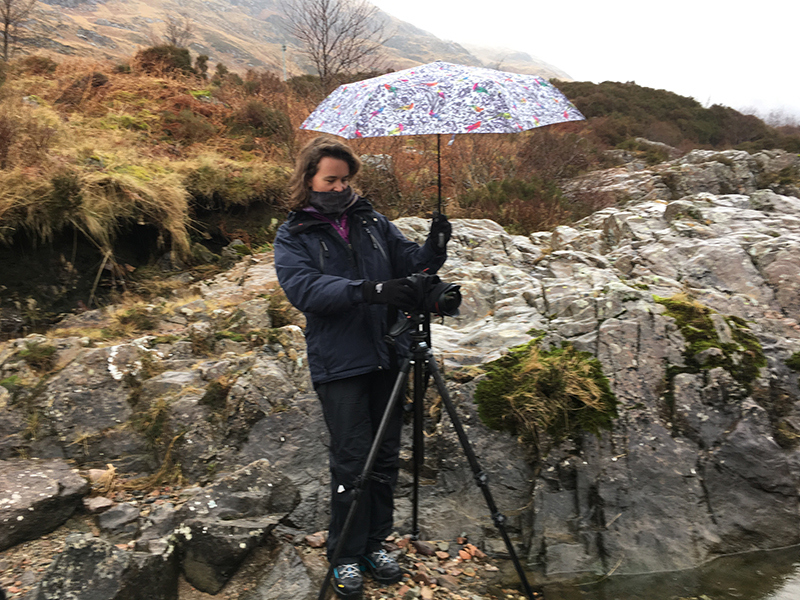
5. Will your kit stay dry?
This is what the rain spots on your lens look like when you finally download your images:
Yes, you can edit them out, but it's much much much easier just to keep the rain off your lens in the first place. Low tech solutions work just as well as high tech ones:
Step 3: Composition
1. Know the basics
Rule of thirds, repetition, symmetry, leading lines, diagonals, single focal point. These are your bread and butter. (And which we will be covering in my free online beginner's photography course later this month - register at the end of this post.)

2. Learn to see
Glen showed me how to really see what is going on in the frame. This is what had been holding me back, and meant that I was creating OK but uninspiring landscape images when I shot wide. Don't let your eye skip over the dark patches, the distracting blades of grass and the busy bits at the edges. If you have the time and money, I can't recommend enough taking lessons for this part - you need someone over your shoulder pointing out the things you've missed. If you don't have the time or the money, find a friend you trust and swap advice with each other.
3. Edge of frame
What's stopping your eye leaving the frame, or conversely, encouraging it to wander away?
This is just the beginning. The hard work starts when you try and put it all into practise. Start paying attention to landscape photography. Analyse where the photographer was standing and why they arranged everything the way they have. How far off the ground was the camera? Can you guess what lens was used? Where does you eye travel through the frame, and how has the photographer contrived that path?
Step 4: Editing
1. Shoot RAW
I know I already mentioned this, but really, switch over to RAW now if you're shooting JPEG. If you don't know what you're shooting, you're probably shooting JPEG. You keep all the information that the camera's JPEG processor throws away forever. Shoot RAW and you can lift shadows and bring back highlights:

Straight out of camera, RAW file

Same file with 4 edits in Lightroom
2. Exposure bracketing
The range of contrast in a landscape image is usually too large for the camera to cope with. You can either have nicely exposed shadows and blown highlights, or a perfect sky and nothing left in the shadows. You can use a graduated neutral density filter to hold back the sky, or you can use exposure bracketing and fix it later.
To exposure bracket, you need to be using a tripod so the camera doesn't move at all between shots. It won't work if it's windy and the trees are moving, and it won't work (so well) if you have fast moving water or clouds. Take 2 or 3 images, exposing for both the shadows and the highlights, and then combine them in editing. For best results make sure the aperture doesn't change between shots.
You can use the Photo > Photo merge > HDR in Lightroom, and in Photoshop you can use the File > Automate > Merge to HDR Pro command. Both of these techniques use an algorithm to decide which information to take from each image before creating a final combined image. If you want more control in Photoshop you can use layers and layer masks to select which parts of which image you want to use.
3. Colour correcting
I'm still half way up the learning curve with this one as it applies to landscape photography. Flowers are easy in comparison - you can remember what colour a peony should be even months later. The colour of light changes through the day though, from cold blues to warm oranges and everything in between. You can try and keep up using the correct colour temperature in-camera, or you can use the bewildering array of colour correction tools afterwards.
A top tip from Glen - do your edits and then come back to them the next day to check you haven't strayed too far from reality.

Too pink?
4. Dodge/burn
I am one of those people who did dodge and burn in an actual darkroom back in the day. I'd forgotten how useful a technique it is though, and how easy it is to do it digitally. It was a real eye opener to see how you can draw attention to parts of an image by dodging (selective lightening), and encourage attention to move smoothly on by burning (selective darkening).
Step 5: Light
1. Knowing the weather
There are no shortcuts to learning how the light behaves in different types of weather. Look at the direction it's coming from and the quality of the shadows it is creating. Start paying attention to the sun, the clouds and the wind. You can learn when you will have rising mist, and when the sun will blaze a glorious sunset; what you need for a blue frosty morning, and what you can get away with shooting at midday.

2. Knowing your location
Again, if time is precious and money no object, hire a guide. Preferably a photographer. Someone who knows where to shoot when it's pouring with rain, where to go for the sunset, how far up that hill you'll need to walk for a better angle.
3. Sunrise/sunset
Sunrise and sunset times are freely available online, but The Photographer's Ephemeris puts everything you need to know in your pocket.
BONUS: How to book a Landscape photography workshop
Ask plenty of questions before you book, so you aren't frustrated or disappointed when you arrive.
1. Be honest about your ability. Ask what progress you can expect to make based on your current skills and experience, and whether you are the right fit for the group.
2. Ask how much hiking will be involved. Can you walk that far carrying all your kit, including your tripod?
3. Explain what kit you have, and check whether you'll be able to join in at each location. Do you need a wide angle and a telephoto? Do you need filters?
4. Check how much hands-on instruction you will get, and whether your images will be reviewed and critiqued. Is editing taught?

FREE BEGINNER'S PHOTOGRAPHy LESSONS
Weekly, step by step lessons to get you from complete beginner to confidently shooting off auto. Start today.
Regular readers will know I do no sponsored posts, use no affiliate links and take no advertising revenue. If I recommend a product or service it's because I've paid full price, used it and loved it.
More details about Glen's courses here: Lightstalker Adventures